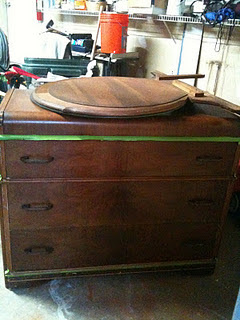
Here is the dresser when I got it from CL for $20.
Here's the next thing I did. I took my Paris Grey Annie Sloan paint and painted the exterior, leaving the drawers with the original wood color.
Next.. here comes the failed decal. I applied the decal, painted primer, and then 2 coats of paint. I have no pictures of the horrific peeling because I was too annoyed to go get my camera.
Ok.. so then I screamed and ripped my hair out and sanded. here are the newly black drawers that I sprayed after sanding them down. I realized that a black silhouette would look better than the wood anyways.
Here's the NEW affixed decal.. remember the color is irrelevant since I'll be just using it as a stencil.
Here's the process of when after the drawers were painted and I began to peel up the decal. I decided to use spray paint this time so I wouldn't have that bleed that regular paint has.
And DRUMROLL PLEASE... Here is the finished dresser after waxing and distressing the edges and corners.
And lastly here are the before/afters of the mirror that goes with it.
And one last time here is the before/after:


remember, this is spoken for in your will!! ;)
ReplyDeleteLOVE it! that is awesome! love the design!!!!
ReplyDeleteAwesome!! I've been wanting to try this with a decal I have, just haven't found the right piece of furniture to use it on yet!
ReplyDeleteThis turned out so cool, I'm so glad it worked!
Well done and thanks for sharing this!
hey, lesson(s) learned, right? and thanks for sharing those hard-learned lessons with us!!
ReplyDeletei think this piece looks fantastic!!
amy
OmiGOSH, I love love LOVE this! I SO admire your persistence with the stencilling...the end result was well worth your investment of time!
ReplyDeleteDeborah (happily visiting from http://upcyclingmylife.blogspot.com...hope you'll stop by too...)
thanks all! it will be so much easier next time I do it!
ReplyDeleteThis came out darling~ what a neat piece! Thank you for sharing at Feathered Nest Friday!
ReplyDeleteA beautiful job Maria! WHERE do you find the time?!
ReplyDelete